🎉🎊 We Are Revamping! Finally! 🎊🎉
After getting so much support and love from you guys ❤️,
I decided to start a new blog.
We are migrating from Blogspot to a WordPress based personal website/blog!
So this blog will be archived from now onwards and will no longer be updated.
For all the new blog posts & exciting things bookmark my new blog/website.
!! These are the new links !!
Blog/Website:- https://www.thevirajshelke.com
Facebook:- https://www.facebook.com/thevirajshelkeblog
YouTube:- https://www.youtube.com/c/thevirajshelke
Instagram:- https://www.instagram.com/thevirajshelke
Hoping for lots of support and love from you all ❤️
Stay Tuned 😉

This is 6th post on Arduino tutorial.
So first experiment on Arduino UNO ? Ready ?
But before you start with it, [just one last thing, I promise :-P], the most important thing is Programming. Programming Arduino UNO will decide how your circuit will work. So if you are well versed with the programming, this will be easy for you.
Basically programming or coding is really a vast field, but I will give you all a basic idea about how will we code Arduino using Arduino IDE.
Programming Arduino :-
- Arduino board has a IC [Microprocessor] which just understands 1's and 0's [Machine language]. We cannot code in machine language.
- Now, Assembly Language is another option of coding, but it is a Low level of language and hence difficult.
- C or java is a language in which we can code easily but Microprocessor's won't understand this, So we use Arduino IDE which allows us to write in C / Java and then compiler converts it to machine language and burns on Microprocessor.
- The code we write on Arduino IDE is saved with a computer extension 'ino' e.g. 'example.ino', this file is just a kind of text file.
- The file that contains the actual code which we burn on chip is, 'hex' file. This file is created by Arduino and burned on chip. We have access to only 'ino' files, which we can edit and burn using Arduino IDE only. [I hope Arduino IDE is already installed, if not go to main page].
- Open the Arduino IDE, you will see a text editor named ' sketch_**** ' this is the default name of your file. [The program written on editor is called as sketch by Arduino].
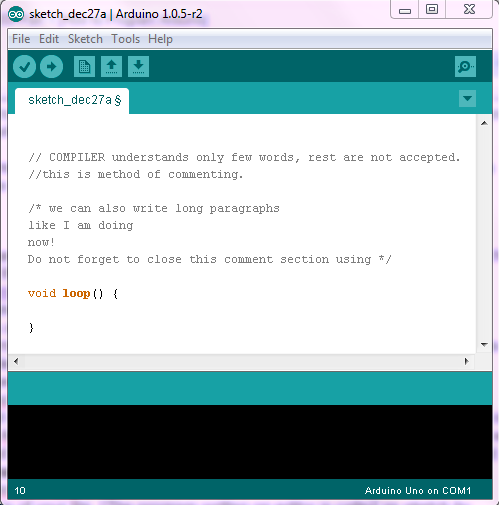
- We can type the program in the editor, which is then checked for syntax error [Mistakes] and compiled. we cannot write anything that is not understood by the compiler, for commenting we can use '//' in start of the line. or use ' /* ' in start and ' */ ' in end if we have many lines of comment refer pic below.
- Now lets take a look at the shortcuts given on the editor,
- Starting from left, the first one is 'verify' it checks for all the syntax errors [and not logical errors]. Your program may be free from syntax error [Arduino IDE will even burn the code] but still the system may not work because the program is not logically correct. So remember syntax error and logical error are different things.
- Second is 'Upload' this uploads or in short burns the code on Arduino board [connected to computer through USB].
- While uploading It's necessary to check few things such as :-
- Tools > Boards > select the board which we have.
- Tools > Serial Port > select the port to which Arduino is connected. [USB port is named as 'COM X', select proper COM X].
- If COM X is not visible install drivers.
- Program is verified and syntax free.
- Next is 'New', 'Open', 'Save'. [I feel there is no need of explaining this :-P]
- The last option to extreme right is 'Serial Monitor'. [More on this topic is explained later]
- Always note that the folder name and the 'INO' file name must be same. [Requirement of Arduino IDE].
Let's continue with the structure of the program in next tutorial.
Visit the next post on 'First Program on Arduino Uno - Blinking LED - Part 2'.
click here.
Comments are welcomed :)
Thank You.
No comments:
Post a Comment